Monday 29 February 2016

Day 17 - Tuesday, Feb 29th

Your job for the rest of this unit is:

  1. Finish all blogs that are due
  2. Complete all Tinkercad labs and report when you are done!
  3. Purchase a land plot
  4. Design your 2D plan for your new house according to building code and by-laws
  5. Get your plan reviewed and approved for the next stage
  6. Design your 3D house in Tinkercad with all frames and textures
  7. Get your 3D house reviewed and approved
  8. Print your 3D house
  9. Build a roof for your house from cardboard
  10. Place your house on your plot, decorate with grass and accessories


Land Plot Update

Lot 1 has been purchased!

Thomas is the 2nd pick and we will wait until he returns to continue purchases.
Keep finishing those lessons!


Day 16 - Monday, Feb 29 - Final House Design - 2D Rubric

First we will design your final house in 2D using all your skills from Homestyler.
If you wish, you may use the new Homestyler Floorplan Beta

After determining which plot of land you are on, you must design the floorplan for the house to build on it.  Remember to follow building codes and bylaws!  Of these the most important is to determine the maximum length and width of your house.  Then you can add the essentials.  Remember to be REALISTIC and similar to the designs you have seen with professional builders!

Steps:
  1. Figure out how big your lot will be from what is available
  2. Calculate your allowable width and length of house you can make
  3. Draw out a box in Homestyler of the length and width you determined.  If you want, you can make your house have a contour and just stick within the box.
  4. Plan out where the following will go in order:
    1. Front door
    2. Front foyer closet
    3. Back door
    4. Side door
    5. Main bedroom and closet
    6. 2nd bedroom and other bedrooms with closets
    7. Bathrooms
    8. Kitchen
    9. Dining room (optional if you have space in kitchen)
    10. Living room
    11. Office (optional)
    12. Any extra closet space

Once figured, you may design you house to the following rubric:


Incomplete
Level 1
Level 2
Level 3
Level 4
House fits within the lot dimensions to code
The house does not fit


The house fits
Front, side and back door
Not present

Missing one or more doors

All present and conforms to standards
Windows in each bedroom
Not present

Smaller or larger than examples
Slightly smaller or larger than examples
Conforms to realistic standards
Kitchen, dining room, living room and front hallway
Not present

Smaller or larger than examples
Slightly smaller or larger than examples
Conforms to realistic standards
Bedroom and bathroom doors opening inwards
Not present

Missing doors

Doors present and open inwards
All rooms and hallways are labeled
Not present

Missing labels

All labels present
Front closet and bedroom closets
Not present

Smaller or larger than examples
Slightly smaller or larger than examples
Conforms to realistic standards
Laundry area and space for washer/dryer
Not present

Smaller or larger than examples
Slightly smaller or larger than examples
Conforms to realistic standards
Stairway area to basement or upper floor
Not present

Smaller or larger than examples
Slightly smaller or larger than examples
Conforms to realistic standards
Living/Dining /Family Room has 3-4 windows for light
Not present

Missing windows

3-4 windows each

Land Plots and Building Code/By-Laws

Here are the plots of land that are available for SMR students to build their house on.
This is the first street (to be named later) in the ongoing construction of the SMR Neighbourhood (to be named later).

Lots will be purchased by draft according to who completes the Tinkercad lab package.

The person who will pick first this year is Owen for completing all Tinkercad labs and all online homework first!

We will vote for the street name later!


City Building Regulations and ByLaws
The City has rules around the construction of buildings on any property.  You must conform to the standards laid out by the City or your project will be rejected and your house cannot be built.
Actual Regulations and ByLaws for Toronto can be found here: Toronto ByLaws and Building Regulations

By-Laws for lots of 25m length:

Boundaries:
Law 1.0:
There must be 1m of walkway space between your house and the side edge of your property.

Law 1.1:
Your house must be exactly 4m back from the front of your property facing the street.

Law 1.2:
The length of your house cannot be greater than:
Maximum House Length = Lot Width / 2 + 10

Law 1.3:
The minimum length of your house must be:
Minimum House Length = Lot Width / 2 + 2

Doors:
Law 2.0:
All houses must have at least a single door entrance

Law 2.1:
All houses must have a single or double door back entrance

Law 2.2:
Houses may have 1 side door entrance (optional)

Law 2.3:
All doors must have a door frame

Windows:
Law 3.0:
All houses must have at least one large window in the front and back of the house

Law 3.1:
Each bedroom must have a window

Law 3.2:
All windows must have a window frame

Interior:
Law 4.0:
Walls are 2.6m high

Law 4.1:
All doors for rooms swing inwards

Law 4.2:
There must be a bathroom.

Law 4.3:
There must be 2 or more bedrooms.

Law 4.4:
There must be a kitchen, living room and front hallway.

Law 4.5:
There must be a window in the kitchen to vent it!

Law 4.6:
There must be a front closet.

Exterior:
Law 5.0:
Each house must have exterior walls made of brick or wood paneled detail


Thursday 25 February 2016

Day 15 - Friday, Feb 26 - Articles on Young and Unemployed Assignment

Young and Unemployed:

Getting a job isn't as simple as going to university and having it handed to you.
Getting a job is a competition.  Without proper planning, you put yourself at a serious disadvantage when you graduate university.

Article 1:
Read the following articles and answer the associated questions:
2016 Youth Unemployment Finally On The Radar
All answers are from this article, no other source:

1.  What is Canada's Youth Unemployment rate in the article?

2.  What country has the worst Youth unemployment rate?

3.  What country has the best youth unemployment rate?

4.  How did Stephen Harper not help the employment situation?

5.  How is Trudeau helping to make more jobs for young Canadians?

6.  What is the problem with the Liberal youth employment strategy?

Article 2:
Toronto Star: Young Educated, Unemployed - Part 2
Read this article and explain why the four people couldn't get jobs.
Suggest something that each person could have done so they would not be unemployed.

Article 3:
Read this article from yesterday!  This is recent news:
Free Education For Low-Income Students (NEWS FROM YESTERDAY!)
Find 2 other articles online talking about the same topic and link them in your blog.

Summarize these articles by explaining how Low-Income Students will get to go to university or college for free.

Read the insane comments from the comment section of this article.  What are some things people are saying against this? (give 3 screenshots, edited to show only what they said)  What are people saying in favour of this? (give 3 screenshots).

Why is this a good thing or bad thing for our society in your opinion?

Day 14 - Thursday, Feb 25 - Lets Buy A House! - Housemod Assignment

Lets Buy A House!

Today we're going to look at an actual place to buy houses in the GTA:

http://madisonhomes.ca/low-rise/cornell/index.php

Concepts and Definitions:

Lots:  A chunk of land you can build a house on.  Usually defined by its width.  A 12M lot means a 12 metre lot wide.  You can build specific houses on that lot.

We will reference this in class from the Siteplan link on the right:
http://madisonhomes.ca/pdf/cornell-siteplan-phase5.pdf

Floorplan:  The basic design of each floor of the house.  The basement is usually empty and "unfinished" which means it does not have a formal floor, only a concrete floor.

Elevation A/B:  These are different designs for specific types of houses of the same model.  Kind of like options you may have depending on elevation type A or B.

PDR:  Powder Room - basically a bathroom by today's standards, which is on the main floor for guests.


-------------------
House Mod Assignment

Go to Tinkercad and search or "house".  Scroll down until you see the projects others have done:


Pick one house design.
Copy and Tinker it!
Make it better by making it larger and adding to it.
You must make a blog post of the house before and after, showing:
  1. An expansion of one or more walls showing that it is LARGER.
  2. An additional room.
  3. An addition to the inside of the house by adding a door.
Show BEFORE and AFTER screenshots side by side!


Wednesday 24 February 2016

SMR Requirements for Course Selection

In Grade 11, SMR students select an SMR Major.  This is the equivalent to the career path you want to take when you graduate.  All requirements are actually based on university requirements.

In Grade 11 you must take:
MCR3U3 - Grade 11 SMR Math
ENG3U1  - Grade 11 Academic English

From there you pick you career path for your major.  Remember that you have to have the pre-requisites before taking higher level courses.  So if you need Grade 12 Physics, you have to take Grade 11 Physics first.

For example, if Bob wants to take Engineering and Bob is picking his courses for Grade 11, then his course selection will look like this:

MCR3U3 - Grade 11 SMR Math
ENG3U  - Grade 11 Academic English
SPH3U   - Grade 11 Physics
SCH3U   - Grade 11 Chemistry

Bob has to take 4 more courses.  They can be electives or they can be required SMR courses.  Remember that all that matters is Bob takes the following Grade 12 courses in Grade 11 or Grade 12:
SPH4U - Grade 12 Physics
SCH4U - Grade 12 Chemistry
MCV4UO - Grade 12 Calculus
MHF4U1 - Grade 12 Functions

So Bob has lots of options.

If Bob loves math and English, and wants to do a coop in an engineering place he can do this:
Grade 11 Course Selection:
MCR3U3 - Grade 11 SMR Math
ENG3U  - Grade 11 Academic English
ENG4U - Grade 12 Academic English
SCH3U   - Grade 11 Chemistry
MCV4UO - Grade 12 Calculus
TEJ4M3 - Grade 12 SMR Engineering
COOP - Coop Course (counts as 2 credits)

Grade 12 Course Selection:
SPH3U   - Grade 11 Physics
SPH4U  - Grade 12 Physics
MHF4U1 - Grade 12 Functions
SCH4U - Grade 12 Chemistry
ICS4U - Grade 12 Computer Science
+ 2 elective courses and a spare!

It is a VERY good idea to take MCR3U3 before you take Physics!!!

Lets say Suzy wants to be a doctor.  So she has to pick the SMR Medical/Research path:

Grade 11 Course Selection:
MCR3U3 - Grade 11 SMR Math
ENG3U  - Grade 11 English
SCH3U - Grade 11 Chemistry
SBI3U - Grade 11 Biology
+ 4 electives

Grade 12 Course Selection:
IDC4MV - Grade 12 Biotechnology
ENG4U - Grade 12 English
MCV4UO - Grade 12 Calculus
MFH4U3 - Grade 12 Functions
SBI4U - Grade 12 Biology
SPH3U - Grade 11 Physics
SPH4U - Grade 12 Physics
SCH4U - Grade 12 Chemistry

OR she could split up her Grade 12 courses so that the last year has a spare:

Grade 11 Course Selection:
MCR3U3 - Grade 11 SMR Math
ENG3U  - Grade 11 English
SCH3U - Grade 11 Chemistry
SBI3U - Grade 11 Biology
SBI4U - Grade 12 Biology
+ 3 elective courses

Grade 12 Course Selection:
IDC4MV - Grade 12 Biotechnology
ENG4U - Grade 12 English
MCV4UO - Grade 12 Calculus
MFH4U3 - Grade 12 Functions
SPH3U - Grade 11 Physics
SPH4U - Grade 12 Physics
SCH4U - Grade 12 Chemistry
+ Spare


Day 13 - Wednesday, Feb 24 - Tinkercad Work Period

People continued to work on their Tinkercad lessons today.

Congrats to Owen for being the first to finish them ALL!


Tuesday 23 February 2016

Day 12 - Tuesday, Feb 23 - Tinkercad Work Period

Today we're working on the Tinkercad lessons.
Each lesson gives us a new ability to use in Tinkercad!
Do as many as you can so that you can do more things in Tinkercad.

If your 3d print looks horrible, we'll all know you didn't do enough lessons.

Looking at the future we're debating whether or not our houses should be in 1/64 or 1/100 scale.

Here is a 1/64 scale house that you should be able to make:

Note the detail on the walls of the house, around the windows and doors plus the fencing.

You will soon make your house in 3d, decorate it to make it look as real as this model.
You will each get a plot of land to build your house on first, and we will learn about how mortgages, land taxes and more factor into actually owning a house!  Fun times ahead!


Monday 22 February 2016

Ongoing Tinkercad Assignment

Ongoing Tinkercad Assignment

Tinkercad contains many amazing lessons to teach you different aspects of CAD.

Click on the Learn menu at the top of the screen to access the lessons.

When you complete a lesson, it will appear in your account.

Click on the Tinkercad symbol at the top left of the screen to see your account.


There is a section called Lessons which saves all lessons you have attempted.


In this course, you will receive marks for lessons you have completed.  Each lesson gives you a new ability in Tinkercad that you can some day use on your own designs.  Don't see this as "work" to do, but see it as training that will make you a better CAD operator.

When it is time to mark your lessons, I will want a screenshot of your lessons page.  
You will include multiple screen shots if your lessons span more than the web browser.  I can also ask you to open up the lessons page for me to mark in class.

Here's an example of what the lessons page could look like.  Please note, that I can tell that one of the lessons is incomplete!  Don't scroll through the lesson just to get the "done" stamp.  It doesn't mean you're done if you cheat.  You're just cheating yourself out of learning how to do something in Tinkercad, and it will be very embarrassing when I ask you about the lesson or look at it in front of you.  Don't be that person.


Day 11 - Monday, Feb 22 - Tinkercad Intro

3D Cad - Tinkercad Intro

Tinkercad is free 3D design software.
CAD stands for Computer Aided Drafting.  It used to take a lot of training to do CAD and CAD software used to cost too much for the average person to afford.  But now anybody has access to free CAD software and it is much easier to use.

Learning one CAD package really well will help you adjust to other CAD programs as they are all very similar.  "Industrial" CAD software is more powerful than the free ones but it is easy to transition.

Go to Tinkercad and Sign up so that your designs are saved:


Basic Concepts:

Axis: (informal definition) a line in 3D space that defines one of 3 different directions (length, width, and height).  The common convention for the 3 axis is X,Y, and Z.
Coordinate space is when look at all 3 axis from a 3d perspective and consider how objects might exist in that space.

The point in which X, Y and Z connect is called the Origin.  The value of X,Y, and Z at the Origin is zero.

Lets say I had a box that was 10cm long, 5cm wide and 2cm high.
I could say that starting at the origin, the box goes along X by 10 units, Y by 5 units and its Z value is 2. (X =length, Y = width, Z = height). 

Note that this is a simplistic way of looking at it, and in later years this will be more formal, but for the purpose of understanding Tinkercad, this is enough.


A good way of remembering which way the positive sides are for each axis is to take your right hand and form a "gun" with your thumb and pointy finger.  These are the X and Y axis.  Now lift you middle finger so it points perpendicular to the pointy finger.  This is Z.  All fingers are pointing in the positive direction for each axis.  This is known as the Right Hand Rule for Unit Vectors.


Workplane:
The workplane is the blue grid space that shows up underneath anything you drag on the screen.
It can be seen as the "working base" and it can be moved and reoriented so that it is along the X,Y or Z axis.  You can also align it with specific objects already on the screen.

Moving the workplane is important because it controls which way is "up" or the z direction of objects that you may place on it. So if you want your roof pointing to the sky, your workplane better be horizontal.  If you want the tip of your airplane to be pointy with a cone shape, your workplane better be flat along the forward edge of the plane!


w = shortcut to adjust workplane

Grouping

Grouping is a tool to merge two solid objects together.
Hold down the shift-key then click on all the objects you want to group together (multiple select).

Then click on the Group button on the upper left to merge them together.

Note the Pyramid and Cube and different colors before grouping.  I have shift-clicked both objects to select them before clicking on Group.

Now that the objects are grouped, they share the same color and look like one object:


Snap:

Snap controls how far something can move so that you can align them.
For instance, a snap of 1.0, make sure that you move something 1.0 units at a time so that you can make a shape that is 10.0 units long instead of 9.99.  It makes it A LOT easier to use the mouse.

The snap grid control is at the bottom right.  This is the unit range that it will move your pieces to.  So you can make something 9.0 long, but not 9.1, 9.2, 8.9.  It must move it to a number that is a multiple of 1.0.

Snap grid is located at the bottom right of the screen:


To change the Snap grid click on the dropdown and you will see the options.
You can turn it completely off if you want but this will make it hard to be precise.


-----------------------------------------------------------------------------------------------------------------
Scale and Edit Geometric Shapes

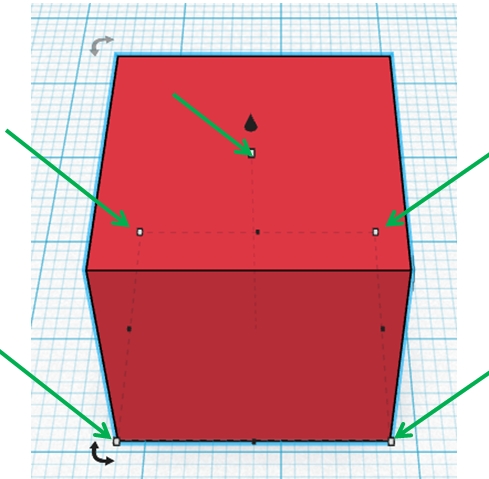
When you select an object, it will display several points that can be used for editing.

White Dots:  5 white dots are used to control the scaling of the X and Y axis dimensions of the box (length and width) or the Z axis dimension (height).  Click on a white box will also give you the dimensions of the edges that can be adjusted.

Black Dots:  There are 4 black dots and a Black arrow pointing up.
The black dots can control the size of that specific edge of the shape.
The black arrow pointing up controls the height of the object (z-axis).


There are 3 rotational arrows that appear (you have to rotate the shape to see them all so one is not shown here).  Clicking on these will rotate the box along a specific axis.

-----------------------------------------------------------------------------------------------------------------

Tinkercad Keyboard Shortcuts:  You may find this list useful in the future:


-----------------------------------------------------------------------------------------------------------------


Saturday 20 February 2016

Essential Web Skills - Screen Shots

Essential Web Skills - Screenshots

Learning how to capture screen shots and edit them is an essential skills for the 21st Century.
You will be asked to make screenshots for your posts.  You should be taking the screen shot and then cropping the photo so that only relevant material is shown in the picture.

Taking  a Screenshot:
On your keyboard there is a key that says "prt sc" above "sysrq".
Prt Scr means print screen.  It captures an image of your screen and puts it into memory where you can Paste it into a document.

Read this article on the 3 ways of creating screenshots:
http://www.wikihow.com/Take-a-Screenshot-in-Microsoft-Windows

Using the snipping tool is probably the best because you can save it straight to your computer.

From here on, you should be able to cut out parts of your images that are useless and don't add to what you are trying to talk about.

Here is what a BAD screenshot looks like:
Notice how the sides of the screen and the top of the browser are in the shot.  These are useless to the image and don't add value.  There's no point in all that image being there.  Trim it down!
Here is what a GOOD screenshot looks like:
The top of the browser and sides are gone.  Only significant information is shown.


Going forward, make sure all your screenshots a properly done!

-----------------------------------------------------------------------------------------------------------------
Adding Arrows and Highlights

You may want to add an arrow to point at something specific like I have done on this blog.

To do this, open up Microsoft Powerpoint.  Copy and Paste your picture into a slide.
Then click on the arrow as shown below.  You must show where you want the arrow to start and end by clicking two points on the screen.


Make sure you change the color so the arrow stands out, and the Weight (thickness) as shown below.

Finally, take a screenshot of your Powerpoints slide and crop and save it.  Done!


Wednesday 17 February 2016

Day 9 - Thursday, Feb 18 - OUAC Assignments

Assignments for Everyone! YAY!

Today's assignment is actually really important.  You will learn a lot about universities, how to apply, how much competition there is and more!  You start with figuring out how to get free money to go to university

There are 2 blog posts to make.  Please make them 2 separate blog postings and use headings where appropriate to organize your answers!

Scholarships Blog Post:

Go to http://www.electronicinfo.ca/
Then go to: http://www.electronicinfo.ca/scholarships

Pick a program/bachelors degree you would like to earn.
Pick 3 universities you would like to go to for this program.
For each university:

  1. Name the program and entrance average
  2. List the prerequisites (courses in high school) required to get into the program
  3. List 2-3 scholarships or bursaries that you think you can win.  Explain why you think you can win these.
  4. Go to the university website or electronicinfo and list the total cost of going to that university for a year.  Include a breakdown listing prices for:
    • Tuition
    • Residence (if outside of Toronto or that is what you're planning)
    • Books and Supplies (if listed)
    • Any other fees that may apply

Ontario University Application Centre Blog Post:

Go to this website: http://www.ouac.on.ca/
This is where you go to apply for university!
General Info:
In a new blog post called OUAC, answer the following questions:
  1. How much does it cost to apply to university?
  2. How many universities can you apply to for this cost?
  3. How much does it cost for additional universities?
  4. For  this coming September, what was the deadline to submit the completed application to OUAC (what was the last date to apply to university)
  5. What date did universities receive grades from students who applied this year?
  6. What is the deadline for Ontario High schools to report 2nd semester midterm marks?
  7. What is the latest date students can expect a response from an Ontario university? (basically when would you hear back from a university by?)
  8. What is the earliest date you have to accept an offer from a university?
Statistics:

Answer the following questions:
  1. Is the trend for people applying to university rising, falling or staying the same. Look at ALL the info to tell me why you think this.  Make a graph in Excel if it helps.
  2. From the University PDF (bottom of the page) - what are the top 3 universities that people are applying to as their 1st choice in 2016?
  3. From the University PDF - what are the bottom 3 universities that people are applying to as their 1st choice in 2016?
  4. From the University PDF - what are the top 3 universities that people are applying to in TOTAL in 2016?
  5. From the University PDF - what are the bottom 3 universities that people are applying to in TOTAL in 2016?
  6. Looking at the Program PDF - what are the top 3 programs people are applying to in 2016 that greater than 10 applicants?
  7. Looking at the Program PDF - what are the bottom 3 programs people are applying to in 2016 that greater than 10 applicants?
Program Statistics:
Look at the Statistics Links for various programs on the right hand side:
  1. What are the 3 most popular medical schools in order?
  2. Are the number of applications to med school increasing, decreasing or staying the same.  Please explain why with reference to all the data provided (not just 1-2 years)
  3. What are the 3 most popular law schools in order?
  4. Are the number of applications to law school increasing, decreasing or staying the same.  Please explain why with reference to all the data provided (not just 1-2 years)


Day 8 - Wednesday, Feb 17 - ElectronicInfo

Due to the course assembly, we have the following to do in class today:

Please review the last blog and modify your total need income to the corrected format:

(Monthly Expenses + Monthly Rent + Monthly Savings) *1.3 = required salary

--------------------------

ElectornicInfo.ca

Go to this website: http://www.electronicinfo.ca/


This is the BEST website for figuring out Post-Secondary education in university.  You can info on:
  • program requirements for specific degrees
  • universities and what programs they offer
  • scholarships
  • and more
Cruise around this site in preparation for a lesson we will have on it.

This site is important because it will help you make a decision on where and what to take in university and even help pay for it.  When you apply to universities, you will want to look at this site again for sure!


Tuesday 16 February 2016

Day 7 - Tuesday, Feb 16 - Cost of Living

Cost of Living

Now that you have an idea of how much it costs to own and rent a place to live, we have to give you the full picture and see what else you need to spend money on as an adult.

This is known as the Cost of Living.


Blog Assignment - The Job To Pay For It All

Go to Numbeo, and estimate your cost of living but enter "none" for rent.
Type up in your blog all the entries you picked and the total you got from Numbeo.  Post a screenshot of the Numbeo site with your numbers.

Pick one of the places from a previous assignment for rent.
Add these two numbers together (Numbeo cost of living + rent).
Type up in your blog what your total cost of living is including rent.

Decide how much money you want to put into savings and investing a year. We will do more details on this but pick something from $100 to $1000 a MONTH.

State your total cost of living after savings.  Multiply this number by 1.3 (this will represent taxes and other expenses).  Then multiply this by 12 to get a total cost for the YEAR.
.
Go to Workopolis's Salary Calculator.  
Find a minimum of THREE careers that will meet your Cost of Living.  Post screenshots of their salaries.
List the careers and what they make.